Donations are the lifeblood of nonprofits, empowering them to fulfill their missions and make a positive impact. For businesses, charitable giving enhances their brand image, fosters customer loyalty, and demonstrates a commitment to social responsibility.
You can effectively use WooCommerce donations plugins to collect donations for your chosen cause and build a strong community of supporters.
This guide will walk you through the steps to create a donation product, configure donation settings, and effectively manage your fundraising efforts.
Why go for WooCommerce donations?
As a matter of fact, WooCommerce can prove to be a powerful and flexible platform for collecting donations. With the touch of the right plugin, WooCommerce donations can become an ideal solution for nonprofits and businesses seeking to engage in charitable giving. The reasons being:
- Flexible donation options: Create products for specific amounts or allow for custom contributions.
- Streamlined checkout: Offer convenient payment options and integrate with popular gateways.
- Recurring donations: Enable ongoing support through subscription options.
- Robust reporting: Track donations and analyze donor behavior.
- Engaging campaigns: Leverage coupons and promotions to incentivize giving.
So how do we achieve these results? Well, one great solution could be StoreApps Name Your Price plugin. Let’s see how to do this
Setting up donations with WooCommerce name your price
Name Your Price is a powerful WooCommerce plugin that allows your customers to set their own prices for products. This innovative approach can significantly impact your sales, especially for unique or intangible products like digital downloads, memberships, or donations.
It is now time to understand how this plugin works. Let’s take the example of a local animal shelter that wants to raise funds to provide food, shelter, and medical care for abandoned animals.
They decide to leverage the power of WooCommerce and the StoreApps Name Your Price plugin to collect donations from their community.
Now let us move on to the steps:
- Install and activate the StoreApps Name Your Price plugin.
- Go to
Products > Add Newin your WordPress Admin dashboard. - Create a new simple product titled “Support Our Shelter Animals.”
- Add a compelling product description explaining the purpose of the donation. You can also Include a heartwarming description like: “Every dollar helps provide food, shelter, and medical care for abandoned animals in need. Your generous contribution will make a real difference in their lives.”Include high-quality images or videos to enhance the appeal.
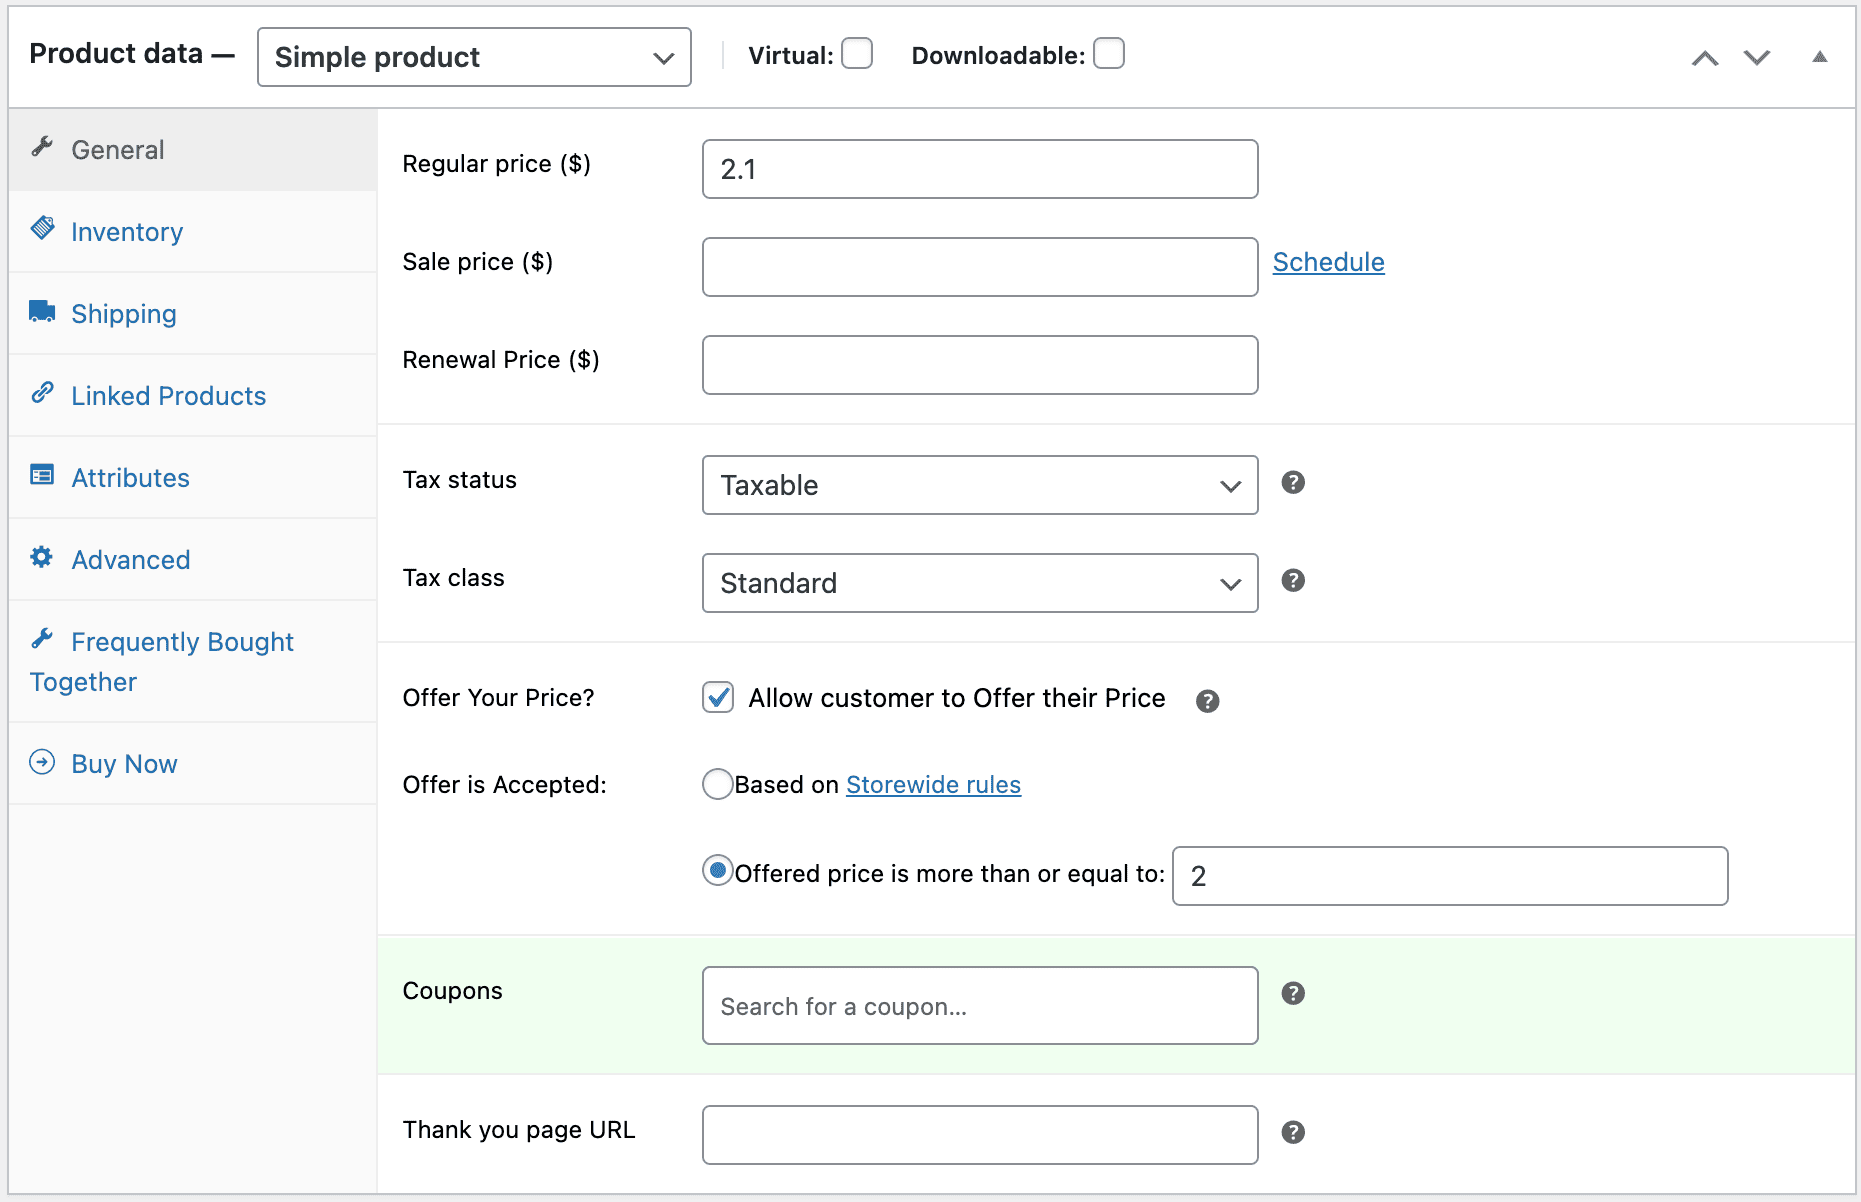
- Set the product type to
Simple product. - Under the
Generalsection, set the Regular price to a nominal amount (e.g., $2.1). - In the Product data section, enable the
Offer Your Priceoption. - Under
Offer is Accepted > Offered price is more than or equal to, enter $2. Keeping the donation price less than regular price will allow users to donate as much as they want to, with the minimum amount being $2. So users can’t donate less than $2. An email would be sent to them for the same. - Next, publish your product.
- Ensure your preferred payment gateways (e.g., PayPal, Stripe) are properly configured in WooCommerce.

And now you are done with setting up your donation product.
Now all you have to do is share your donation page on your website, social media channels, and through email marketing campaigns.
Crafting a compelling donation page
A well-designed donation page is crucial for successful fundraising. Here’s how to optimize yours:
- Clear & concise messaging: Clearly articulate your mission and how donations directly impact the lives of animals.
- Visually engaging content: Use heartwarming photos and videos of rescued animals to evoke empathy and inspire giving.
- Set achievable goals: Define specific fundraising goals and track progress with a visually appealing thermometer.
- Leverage social proof: Showcase heartwarming testimonials and share inspiring success stories of rescued animals.
- Email marketing power: Segment your audience, craft compelling email appeals with Icegram Express, and include clear calls to action.
- Content marketing: Create engaging blog posts and videos about shelter life and the impact of donations. Optimize content for search engines to reach a wider audience.
- Community engagement: Collaborate with local influencers and participate in community events to raise awareness and generate support.
- Show your gratitude: Express sincere appreciation with personalized thank-you notes and share inspiring impact reports with your donors.
These strategies can effectively promote your donation campaign, maximize your fundraising efforts, and build lasting relationships with your supporters.
Conclusion
Ready to transform your website into a powerful fundraising machine? WooCommerce empowers both non-profits and businesses to seamlessly collect donations and make a real impact.
Whether you’re supporting a vital cause or simply giving back to your community, Name Your Price plugin provides the flexibility and functionality to create a seamless and impactful donation experience.
