Updating product prices in WooCommerce – sounds simple, right?
Few minutes later, you find yourself 27 tabs deep in product pages, wondering how you went from “I’ll just change a few prices” to questioning all your life choices.
Let’s be honest – editing prices one by one is a test of patience, time, and sanity.
You change the regular price here, tweak the sale price there, and by the time you reach product #47, your brain starts melting.
Oh, and did you remember to update that one variant in that one variable product? Yeah… neither did we.
And the worst part? One small mistake and boom – either your profit margin takes a hit, or your customer sees a $5,000 yoga mat. Not ideal.
So if you’re tired of playing this game and need a smarter way to update prices in bulk, you’re in the right place.
We’ll walk you through the easy, “where-has-this-been-all-my-life” method.
But first, let’s see how to do this with WooCommerce.
Bulk editing with default WooCommerce – Good luck with that
So, you’re selling on WooCommerce and thinking, “Wait… doesn’t WooCommerce already let me bulk edit prices?”
Technically yes. WooCommerce does offer some bulk editing options. But using them feels like bringing a butter knife to a sword fight.
Let’s walk through it — and you’ll see where things get confusing:
For a single product
- Go to your
WordPress admin > Products > All Products. - Then, select the product you want to change the prices for.
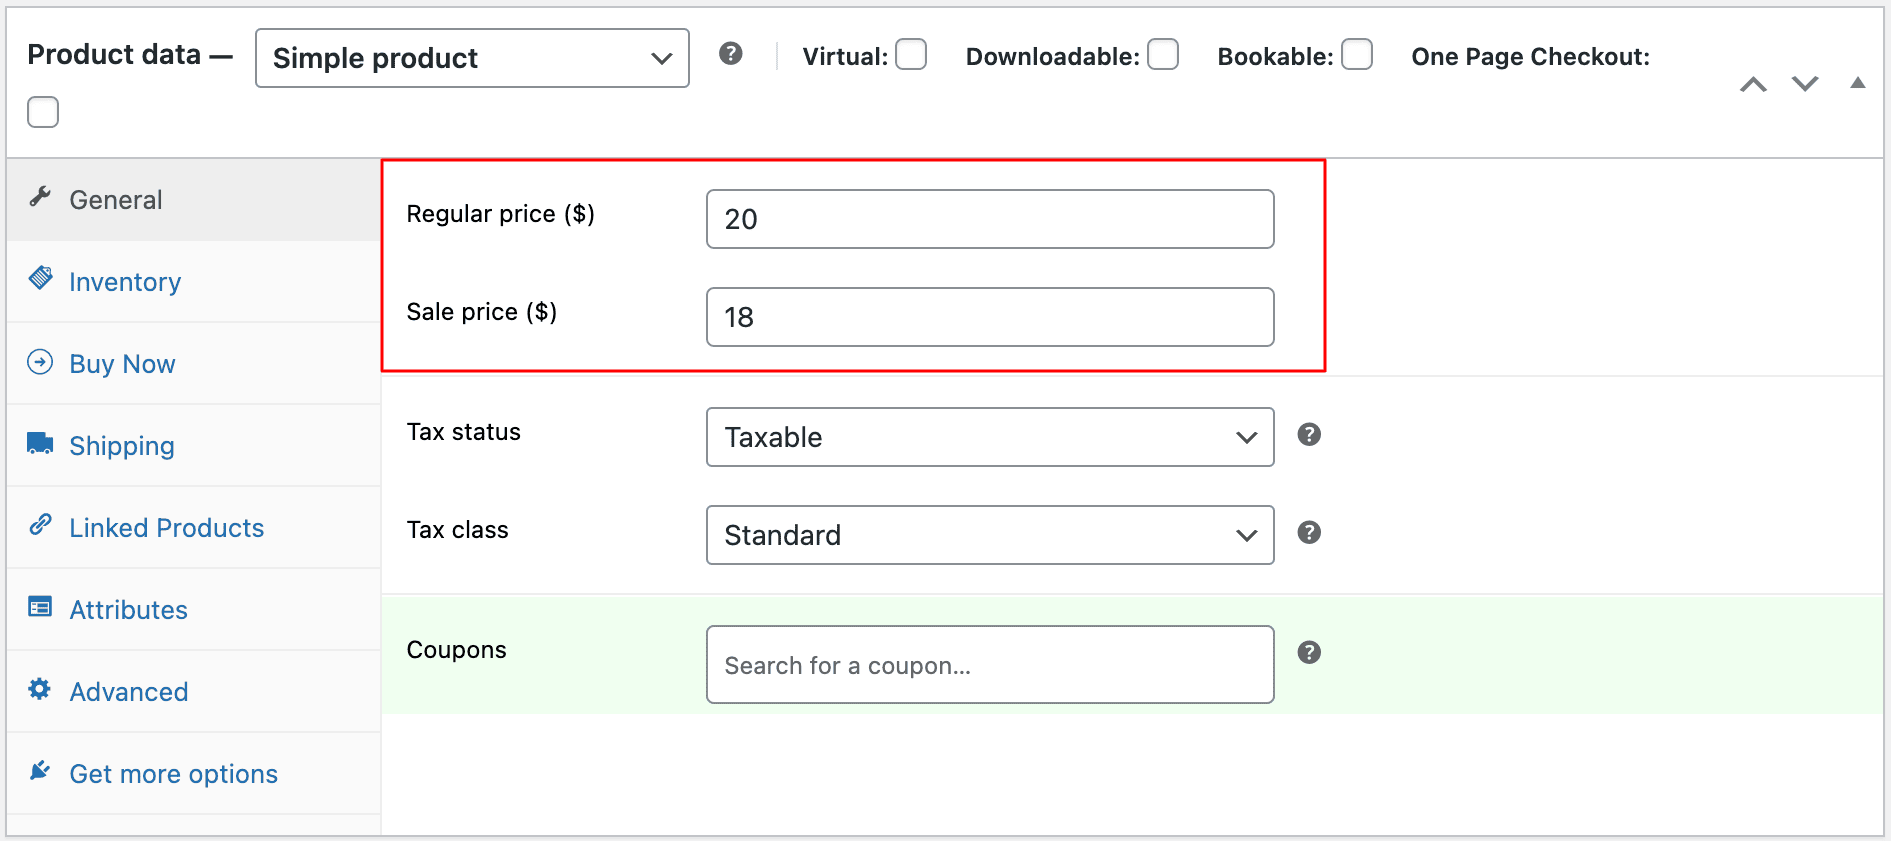
- Under
Productdata, go to theGeneraltab. You get two pricing options:- Regular price: The product’s standard price.
- Sale price: The discounted product price. It should be lower than the original product cost.
- Click on
Updateto save your changes.
Pro tip: Feeling lazy? Click on the Quick Edit that appears when you hover over each product name option. Enter the regular price and sale price and update them.
For bulk edits (but only for simple products)
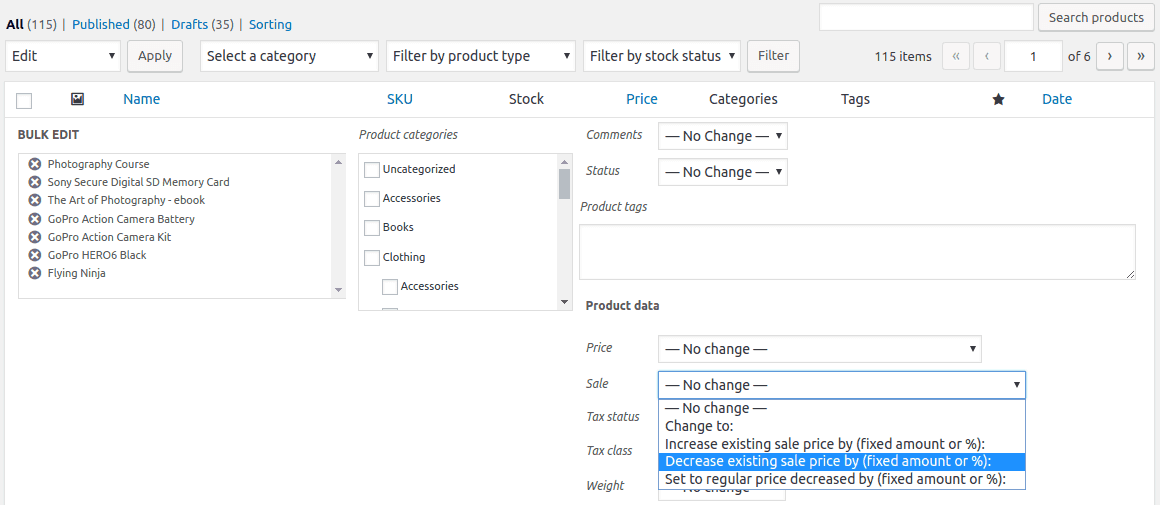
- Go to
WordPress admin > Products > All Products. - Tick all the products you want to edit the price for, directly or using filters.
- Click on
Bulk Actions > Edit > Apply. - Under
Product data > Price, select either of these options:- No change.
- Change to: Enter the required price.
- Increase existing price by: Raise the price by % or a fixed amount.
- Decrease existing price by: Lower the price by % or a fixed amount.
- Under
Product data > Sale, select either of these options:- No change.
- Change to: Enter the required price.
- Increase existing sale price by: Raise the price by % or a fixed amount.
- Decrease existing sale price by: Lower the price by % or a fixed amount.
- Set to regular price decrease by: The sale price will be calculated based on the reduced regular price by % or a fixed amount.
- Click on
Update.
That’s quite basic and time-consuming! Simple, right? Well, here comes your reality check.
What could go wrong? Well, plenty!
The default WooCommerce method works great if you have a small business with simple products. But add a teeny weeny complexity and you are done. Here’s how could go south:
- Too many clicks: Open product > scroll > change price > update > wait > repeat * 100 > lose your will to live.
- Prone to errors: One typo in a price, and congratulations, you have given an 80% discount on your luxury item.
- Time-sucking monster: Have 100+ products? Say goodbye to your weekend.
- No logic filters: Want to update products based on category? (Evil laughter) Good luck with that.
- No undo button: Messed up? Your future self won’t forgive you.
But hey — when one door frustrates you with endless clicking, there’s always another that swings wide open… and this one comes with Smart Manager written all over it.
Ready to peek inside?
Meet Smart Manager – The best WooCommerce bulk edit price plugin?
Ready? Because behind that door is not just a plugin—it’s your new WooCommerce BFF.
Smart Manager doesn’t play around. It looks at WooCommerce’s clunky bulk edit screen and goes, “Cute. Now watch this.”
This plugin provides you Excel-like control inside your WordPress dashboard.
Edit, update, add, delete, all from one screen.
No clicking through multiple tabs. No holding your breath while updating prices.
- Edit like you’re in Microsoft Excel or Google Sheets.
- Add new products like you’re making a to-do list.
- Undo mistakes like they never happened.
Smart Manager brings logic, speed, and a much-needed sense of sanity to your store.
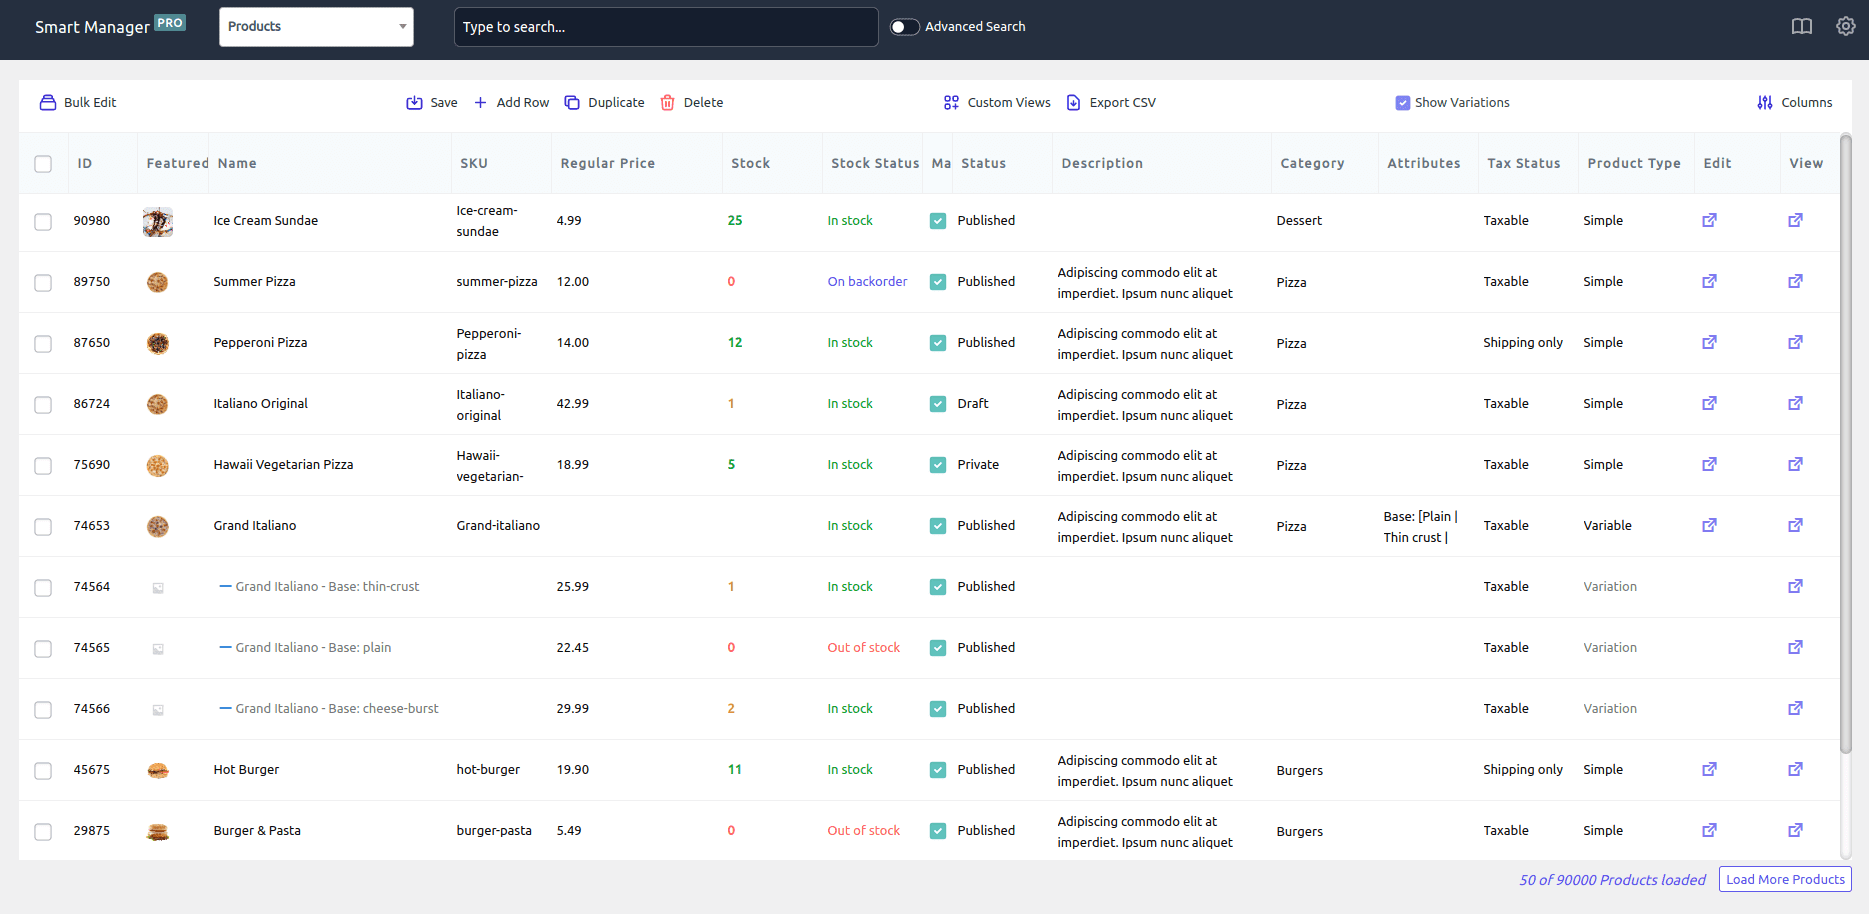
And the best part? It works beautifully with all WooCommerce product types.
So you can bulk edit prices of subscription products, bookable products, membership products and any custom fields — bring it on.
Let’s dive in and see just how smart Smart Manager really is.
Price field controls like no other
Smart Manager is more than just another bulk editor — your personal pricing command center.
Whether you’re planning a sale, fixing mistakes, or testing new price strategies, you get full control over both the Regular Price and Sale Price fields:
Here’s everything you can do with pricing:
- Bulk edit sale price, regular price, bulk order, SKUs, stock status, product title, gallery images, tax status and more.
- Bulk edit variation prices or any other product type – bundle, affiliate, etc.
- Increase or decrease prices by a fixed amount or percentage in bulk.
- Set the sale price the same as the regular price in bulk.
- Inline edit stock price (direct edit) – no need to go through individual products.
- Bulk edit price of only selected products.
- Update prices based on product categories in bulk.
- Bulk update sign-up fees, recurring fees, etc.
- Add prices in bulk to the products.
- Apply search filters and edit prices of selected products.
- Use price filters to make a change. Say find all products above $200 and decrease their price by 10%.
- Update product price based on the condition – Say increase the price of products belonging to the category clothing and price above $100 by 15%.
That proves how flexible and powerful Smart Manager is.
Why is Smart Manager a game changer?
Okay, we’ve raved about how amazing Smart Manager is, but you’re probably thinking – “Cool, but what’s in it for me?”
Well, roll up your sleeves because things are going to get serious.
How to set the sale price x% lower than regular price for multiple products at once?
Say you want to run a storewide sale — 20% off everything. Here’s how to set it up:
- Go to
Smart Manager > Productsdashboard. - Click on the header checkbox to select all the products and click on Bulk Edit.
- You will have two options:
NewandManage scheduled edits. Now select New. - You will see a slide-over panel. In the
Actionsoption, select ‘Sale price’ from the drop-down. - Next, in the second column, select ‘set to regular price and decrease by %’.
- And finally, add 20 in the value.
- Now click on
Update. You will get two options:NoworSchedule for later. Choose any one and you are done.
Boom. Smart Manager sets the regular price (if missing) and applies the % discount — all in one shot.
How to increase the price for all products containing a specific attribute?
Let’s say you sell T-shirts. Now suddenly, the “100% Organic Cotton” ones are getting all the attention.
Because who doesn’t want to save the planet and look good doing it?
It’s time to ride the green wave and give these premium pieces a price lift. Here’s how:
- Head to
Smart Manager > Productsdashboard. - Click on
Advanced Search. - In the first dropdown, select
Attributes: Fabric. - Keep the second one as is.
- In the third dropdown, choose 100% Organic Cotton.
- Click
Search. - Select all the filtered products.
- Use
Bulk Editto bump up the price — as shown before.
And you are done.
How to increase the price for all products containing a specific category?
Say you’re a skincare seller and “Ceramide-Infused” is the new buzzword — thanks to that one influencer who swears it fixed their entire life.
Now, everything with that ceramide tag needs a little price glow-up. Here’s how to do that:
- Go to
Smart Manager > Productsdashboard. - Select
Advanced Search. A slide-up panel will open. - Here in the first option, select
Category. - Keep the second option as is.
- Next, in the third option, select Ceramides from the drop-down.
- Click on
Search. - Now all the products from the said category would show up.
- Just select them and bulk edit their price as explained before.
And just like that, your trendy ceramide collection is now 20% more expensive — and still 100% sold out.
How to correct pricing errors?
Let’s say you sell premium home decor, vases, lamps, statement mirrors, etc.
Everything is smooth until one little typo later, your $300 mirror is listed at $30. Guess who’s crying? (Hint: it’s not the customer.)
Here’s how to fix it faster than your heart rate after noticing the mistake:
- Go to
Smart Manager > Productsdashboard. - Now you will see a
Searchoption at the top. - Type mirror and click on enter. You will see all of your mirror products.
- Next, locate the product, click on the regular price cell and update it to $300.
That’s it. Now just sit and wish no one noticed this and order this yet.
How to set prices for the future?
Imagine you run an electronics store and a new version of your bestselling noise-cancelling headphone collection just dropped. Now, you want to run a product launch sale for an hour and give an exclusive 10% discount.
Here’s how to do this in minutes:
- Go to
Smart Manager > Productdashboard. - Search and select the new headphone models.
- Now click on
Bulk edit. - Under Actions, select
Regular pricefrom the drop-down. - In the next option, select decrease by %.
- In the last option, add the value, i.e., 10.
- Click on the
Updateand you will see two options —NoworSchedule for later. - Select Schedule for later. A new popup will open.
- Here on the Schedule For option, add the time of the sale.
- And click
Ok.
Voila! You’ve got your discount running exactly when you want it, without waking up to update prices at 2 AM.
Now, if you can revert the prices after the promotion ends by simply using the Undo feature. Here’s how to do that:
- First click on
Show Tasksin the top-right corner near the ‘Columns’ button. - Now, the list of all bulk edit and inline edits tasks will be listed.
- Here select the task and click on the
Undobutton located on the top bar above the grid. - You will see two options:
Selected tasksandAll tasks. - Choose Selected tasks.
And that’s it. The prices would go back to as it was before the sale.
Stop clicking around, start managing smart
There you have it — Smart Manager is more than just a tool; it’s your behind-the-scenes superhero. Whether you’re updating prices for 5 or 5000 products, running limited-time offers, or boosting sales for specific attributes, Smart Manager’s got your back.
So, why settle for clunky, time-consuming methods when you can edit prices like a pro with just a few clicks?